| Download | Purchase | FAQ | Home |
Step #1 - Operation Step #2 - Images Step #3 - Web Page Step #4 - FTP Step #5 - Finish
Quick Start Guide Detailed Setup Thumbnail Properties WebPage Appearance FTP Settings Program Automation E-mail Settings HTTP Settings Misc Options GPS Setup HTML Properties Miscellaneous HTML
EXIF Editor Batch Processing Rotating Images
Preview Web Pages View Web Pages Sample Web Page Font Properties
RoboPhoto FAQ What's New in v3.0 Screen Shots Advanced Features HTML Template Files Sign Up With Tripod PAD File (htm) PAD File (xml) Legal Info End-User License
System Requirements Demo Limitations Download The Demo Purchase Unlocking The Demo |
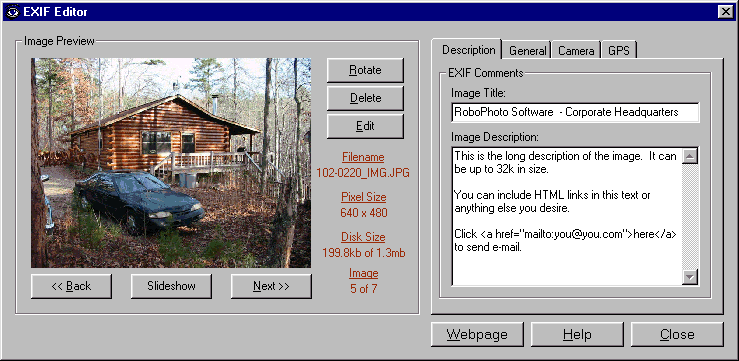
The EXIF editor allows you to preview, rotate, delete, manipulate, and edit the EXIF information associated with images. There's also a slideshow feature for easy viewing. You can access this screen by right clicking on any wizard screen or by selecting the 'Perform Other Image Operations' when prompted for the image source directory. Image Information For technical information about the image, click on it. This is a quick way to see if a JPG image is in EXIF format. Back to the top Rotate Click this button to rotate the image. Back to the top Delete Click this button to permanently delete the image from disk. Back to the top Edit When this button is clicked, the Windows program that you have associated with JPG files will be loaded with the current image. To use a program other than the default, specify the ImageEditorPath Misc Option. RoboPhoto will wait until the external program ends before resuming, i.e. you must exit the external program before you can access RoboPhoto again. Back to the top Previous Image Click this button to display the previous image in the image set. NOTE: If you change the EXIF information, the JPG file will be resaved when this button (or the 'Next' button) is clicked. You want to minimize the number of times a JPG is saved, so if you're editing the EXIF info, edit all of the fields before proceeding to the next image. Back to the top Slideshow The slideshow feature loops through the images, displaying each for 2 seconds. You can use a different delay by specifying the SlideShowDelay Misc Option. Back to the top Next Image Click this button to display the next image in the image set. See the comments about resaving (above) if you're editing the EXIF information. Back to the top Image Title Enter a short title for the image. If a title exists and if one is not specified in images.xml, it's used for the <!--TitleText--> tag in your HTML template files. If no image title exists, the title as defined in the HTML customization file is used. Back to the top Image Description Enter a detailed description of the image. You can optionally enter HTML formatted text, as shown in the screen above. Do not enter HTML <br> tags, as they are automatically inserted when a carriage return is detected. The description can be up to 32k bytes long. If a detailed description exists and if one is not specified in images.xml, it's used for <!--ImageLongDescription--> tag in your HTML template files. Back to the top Webpage Click this button to preview a web page that uses the images. Back to the top Help Click this button to load the help file. You can also press the F1 key anywhere in the program for context sensitive help. Back to the top Close Click this button to close the form. Back to the top 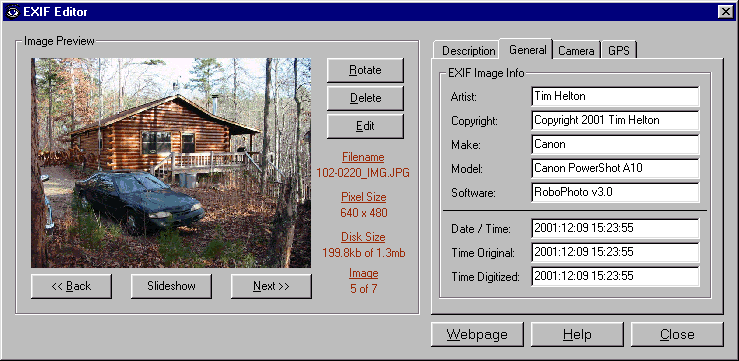
Image Artist This EXIF field contains the name of the camera owner, photographer or image creator. Example: Nort McGurski Back to the top Image Copyright This EXIF field should contain the copyright notice of the person who owns the image. Example: Copyright 2002 Nort McGurski. All Rights Reserved. Back to the top Camera Make This EXIF field is almost always written by the digital camera and it contains the manufacturer of the recording equipment. You shouldn't normally edit this comment. Back to the top Camera Model This EXIF field is almost always written by the digital camera and it contains the model name or model number of the equipment used to generate the image. You shouldn't normally edit this comment. Back to the top EXIF Software This EXIF field records the software or camera firmware that was used to generate the image. If you edit any EXIF field and if this field is blank, 'RoboPhoto v3.0' is automatically written. Back to the top Date / Time The date and time of the image creation is written to this EXIF field. The format is a local time and is of the form YYYY:MM:DD HH:MM:SS. This is an important field and your camera must write it if you plan on georeferencing images. The only exception to this is when using a non-EXIF camera that writes JPGs with disk dates that match the time the picture was taken. An example is Sony's floppy disk based models like the FD-91. You must specify the UseDiskFileDate Misc Option to use the disk dates instead of the EXIF times. Back to the top Original Time The date and time when the original image was generated is written to this EXIF field. The format is a local time and is of the form YYYY:MM:DD HH:MM:SS. This is almost always the same as the Date / Time field. Back to the top Digitized Time The date and time when the original image was stored as digital data is written to this EXIF field. The format is a local time and is of the form YYYY:MM:DD HH:MM:SS. Back to the top 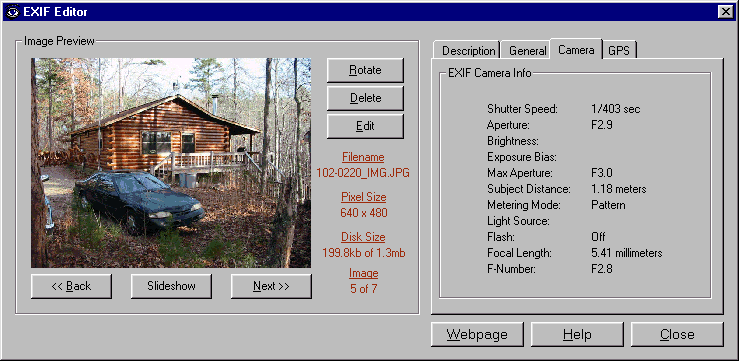
Camera Information These EXIF fields are read-only and contain information relating to the picture taking conditions. Don't be surprised if the camera writes information that's not what you expect - especially the 'Subject Distance' values. Also note that most cameras do not write all of the fields. Back to the top 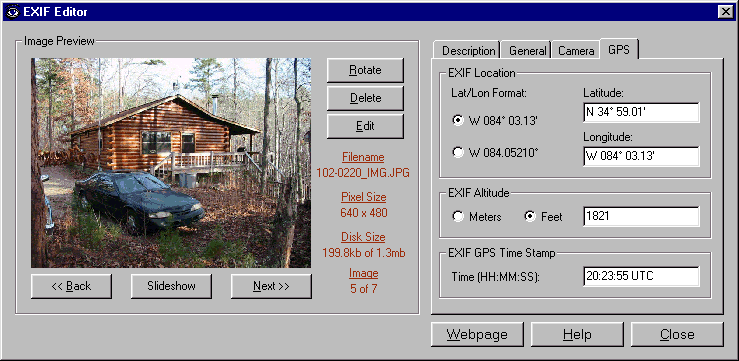
Coordinate Format You can input latitude and longitude information in either decimal degrees or in degrees plus decimal minutes. Select the format that is most convenient for you and/or the one that matches what your GPS displays. Note: It's only possible to write EXIF information that's accurate to 2 decimal places on the minutes. So, if you enter the latitude and longitude values in decimal degrees (which is more accurate than that) and then reload the image, what you originally entered will probably differ from that displayed. That's not a bug with RoboPhoto - it's a limitation with the EXIF specification. Back to the top Latitude Enter the latitude of the image. Latitude values range from 0 degrees at the equator to 90 degrees at the poles. The 'N' or 'S' designates whether the point is north or south of the equator. For example, the latitude of Atlanta GA USA is 'N 33.64044'. If Atlanta was an equal distance south of the equator, the latitude would be 'S 33.64044'. Brazil has a (S)outh latitude. Back to the top Longitude Enter the longitude of the image. Longitude values range from 0 degrees in Greenwich England to 180 degrees on the opposite side of the earth (between Japan and Hawaii). The 'E' or 'W' designates whether the point is east or west of Greenwich England. For example, the longitude of Atlanta GA USA is 'W 84.42694'. If Atlanta was on the opposite side of the earth, the longitude would be 'E 84.42694'. China has an (E)ast longitude. Back to the top Altitude Enter the altitude of the image above sea level. Altitude values are always written to the EXIF headers in meters, so if you choose feet for the units and then reload the image, the value displayed may be slightly different due to rounding errors. Back to the top GPS Time Stamp This field contains the UTC (Coordinated Universal Time) time when the GPS coordinates were recorded. The format is of the form HH:MM:SS. For locations west of Greenwich England, like in the USA, the UTC time is ahead of the local time. If east, like in Japan, UTC time is behind the local time. For example, during daylight savings time on the east coast of the USA, UTC time is 4 hours ahead of the local time, i.e. 6:00am local equals 10:00am UTC. During non-daylight savings time (winter), UTC time is 5 hours ahead of the local time. To quickly determine the time difference in your area, click on the Windows clock and note the difference. For Atlanta in the winter this shows 'GMT -05:00', which means you must subtract 5 hours from UTC time to determine the local time. Back to the top |